


How to Select the Right Texture for a Plastic Injection Mould
When you design a plastic product, the surface feel is just as important as the shape. A good plastic mold texture makes your product look premium and feel great in the hand. People judge products by how they look and touch. As a specialized mould service provider, we help businesses design and develop perfect moulds. We provide expert services to build your mold right from the start.
This guide will show you how to pick the best surface finish for your project. We use clear steps so you can easily understand the process.
Why Does Plastic Mould Texture Matter?
You might wonder why surface texture is so important. First, it improves the look of the product. A shiny surface shows every small scratch and fingerprint. A textured surface hides these flaws easily. Second, it improves the feel. A rough surface gives the user a better grip. Finally, it adds value. Choosing the right injection mould finish makes a simple plastic part look like a high-end product without changing the core design.
Key Factors in Mould Texture Selection
To make the best choice, you must think about a few simple rules. Good mould texture selection depends on function, material, and design.
1. Product Function and User Experience
Think about how the user will hold the product. If they need a tight grip, like on a power tool or a toothbrush, choose a deeper, rougher texture. If the product is a cosmetic container that people touch gently, choose a soft, fine texture. The function always guides your mould grain selection.
2. Plastic Material Compatibility
Different plastics flow differently inside the mould. Some plastics shrink more than others when they cool down. If you pick a very deep texture, you must use a plastic that can flow into those deep corners. If the plastic cannot fill the deep texture, the final part will look blurry or incomplete. Always match the texture depth to the plastic type.
3. Draft Angles and Part Ejection
This is the most critical rule. Draft angles are the slight slant on the mould walls. When you add texture, the surface gets rough. If the walls are straight up and down, the rough texture will scratch and tear the plastic part when it comes out. You must add more draft angle for deeper textures. A general rule is to add one extra degree of draft for every 0.001 inches of texture depth.
Popular Types of Injection Mould Finish
There are many options when you start your mould grain selection. We categorize them into three main groups.
Natural Grains
These textures mimic nature. They include leather patterns, and stone finishes. Natural grains are very popular for consumer goods because they feel warm and organic. They also hide manufacturing lines very well.
Geometric Patterns
These are man-made designs. They include straight lines, cross-hatches, dots, and grids. Geometric patterns give a modern, technical look. They are excellent for electronic housings and automotive parts.
Custom Mould Texture
Sometimes, standard patterns do not fit your brand. In these cases, you can create a custom mould texture. We can help you design a unique pattern that includes your logo or a specific brand motif. A custom mould texture makes your product stand out from competitors, but it requires more time and expertise to design correctly.
Step-by-Step Guide to Mould Grain Selection
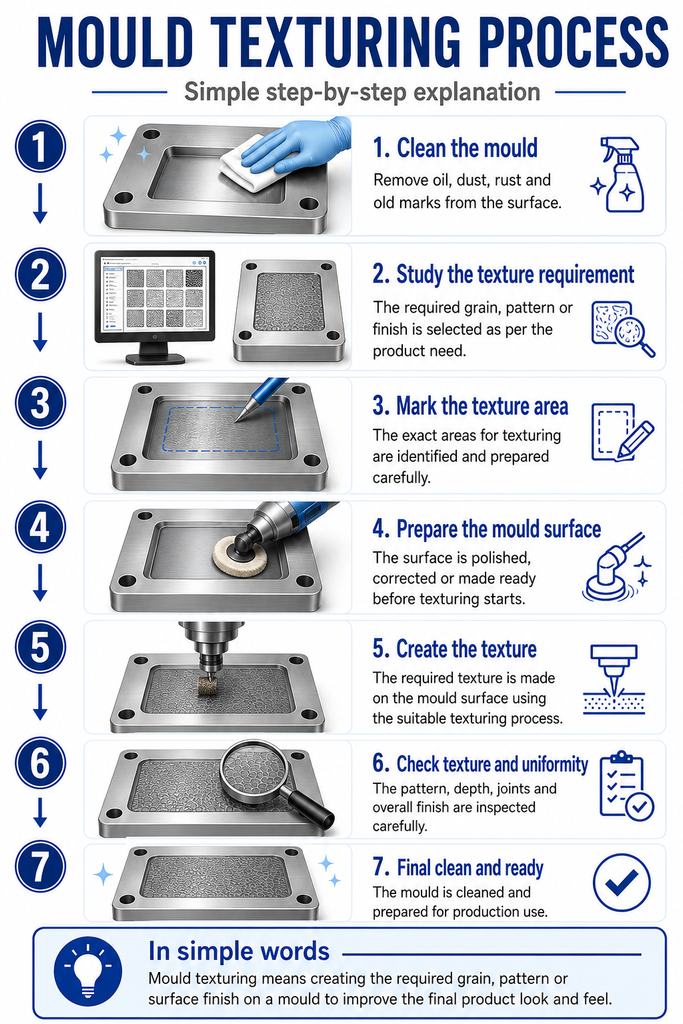
Follow these simple steps to ensure your mould texture selection process goes smoothly.
Step 1: Define Your Goal
Decide what you want the texture to achieve. Do you want to hide parting lines? Do you want to improve grip? Or do you just want a specific look? Write down your main goal.
Step 2: Choose Your Plastic Material
Select the exact plastic resin you will use. Different resins interact differently with textures. Share this material choice with your mould service provider early in the process.
Step 3: Adjust the Design and Draft Angles
Work with your design team to add the correct draft angles to the 3D model. Remember the rule: deeper textures need more draft. If you skip this step, the part will get stuck in the mould.
Step 4: Select the Texture Standard
Pick a standard texture catalog, like the popular SPI or Mold-Tech standards. These catalogs give you exact measurements and depths for every pattern.
Step 5: Create a Test Sample
Before we apply the final texture to the main mould, we create a small test block. We apply the texture to this block and inject test plastic. This lets you see and feel the injection mould finish before we finish the main tool.
Common Mistakes to Avoid in Mould Texture Selection
Many beginners make simple errors that ruin the final product. Avoid these common mistakes.
- Forgetting Draft Angles: As mentioned, this is the biggest mistake. Without enough draft, the texture will drag and damage the plastic part during ejection.
- Picking a Texture Too Deep for the Plastic: If the plastic cannot flow into the deep grooves, the texture will look faded and weak.
- Ignoring the Parting Line: The parting line is where the two halves of the mould meet. If you place a heavy texture right on the parting line, it will create a visible, ugly step on the final product. Keep textures away from parting lines.
- Changing the Texture Late: Adding texture after the mould is already cut is very difficult and expensive. Plan your plastic mold texture during the initial design phase.
How Our Mould Services Help You
It is important to understand our role. We are not a manufacturing plant for final plastic goods. We strictly provide professional mould service.Our expert team guides your mould texture selection from day one. We help you choose the right plastic mould texture that fits your budget and design. We manage the mould design, source the right steel, and oversee the texturing process. We ensure your mould grain selection matches your plastic material perfectly. By using our specialized services, you avoid costly mistakes and get a high-quality mould ready for production.
Conclusion
Choosing the right surface finish transforms a basic plastic part into a premium product. Good mould texture selection improves aesthetics, hides flaws, and enhances user grip. By understanding draft angles, material flow, and texture types, you can make the right choice for your project.Remember to plan early and test your samples. If you need expert help, Jai ambay Etching Process has an more than 30+ years of Experience.Our team is ready to assist. We provide top-tier mould services to ensure your plastic mould texture is perfect. Contact us today to start your next mould project with confidence!
Frequently Asked Questions (FAQs)
What is the most popular plastic mould texture?
Leather and fine matte finishes are the most popular. They hide scratches well and feel great in the hand.
How does custom mould texture affect cost?
A custom mould texture costs more than a standard pattern. It requires custom chemical etching or CNC engraving, which takes extra time and specialized skills.
Can I change the injection mould finish later?
Yes, but it is expensive. If you want a deeper texture later, we must remove steel from the mould. If you want a shallower texture, we must weld steel back into the mould and re-cut it. Always choose the right injection mould finish the first time.
Does texture affect the strength of the plastic part?
No. Texture only changes the surface of the part. It does not change the internal strength or structural integrity of the plastic.

