


Chemical Etching for Mould Texturing: Complete Process and Application Guide
Introduction
A good mould texture starts with the right process and proper surface preparation. For many years, chemical etching for mould texturing has been used to create grain, matte, leather-like, and other surface patterns on moulds.
The process uses controlled chemicals to remove a very small amount of metal from selected areas of the mould. This creates the required pattern and mould texture depth.
Chemical etching remains useful even with the growth of modern laser texturing. It can be a practical choice for very large mould surfaces, certain deep textures, and some traditional grain patterns.
However, good results depend on much more than applying chemicals. The mould steel, polishing quality, welding, texture depth, draft angle, masking, and process control all affect the final result.
This guide explains the complete chemical etching process, where it works best, its limitations, and what mould manufacturers should check before starting the job.
What Is Chemical Etching for Mould Texturing?
Chemical etching for mould texturing is a controlled process that creates a texture directly on the surface of a mould.
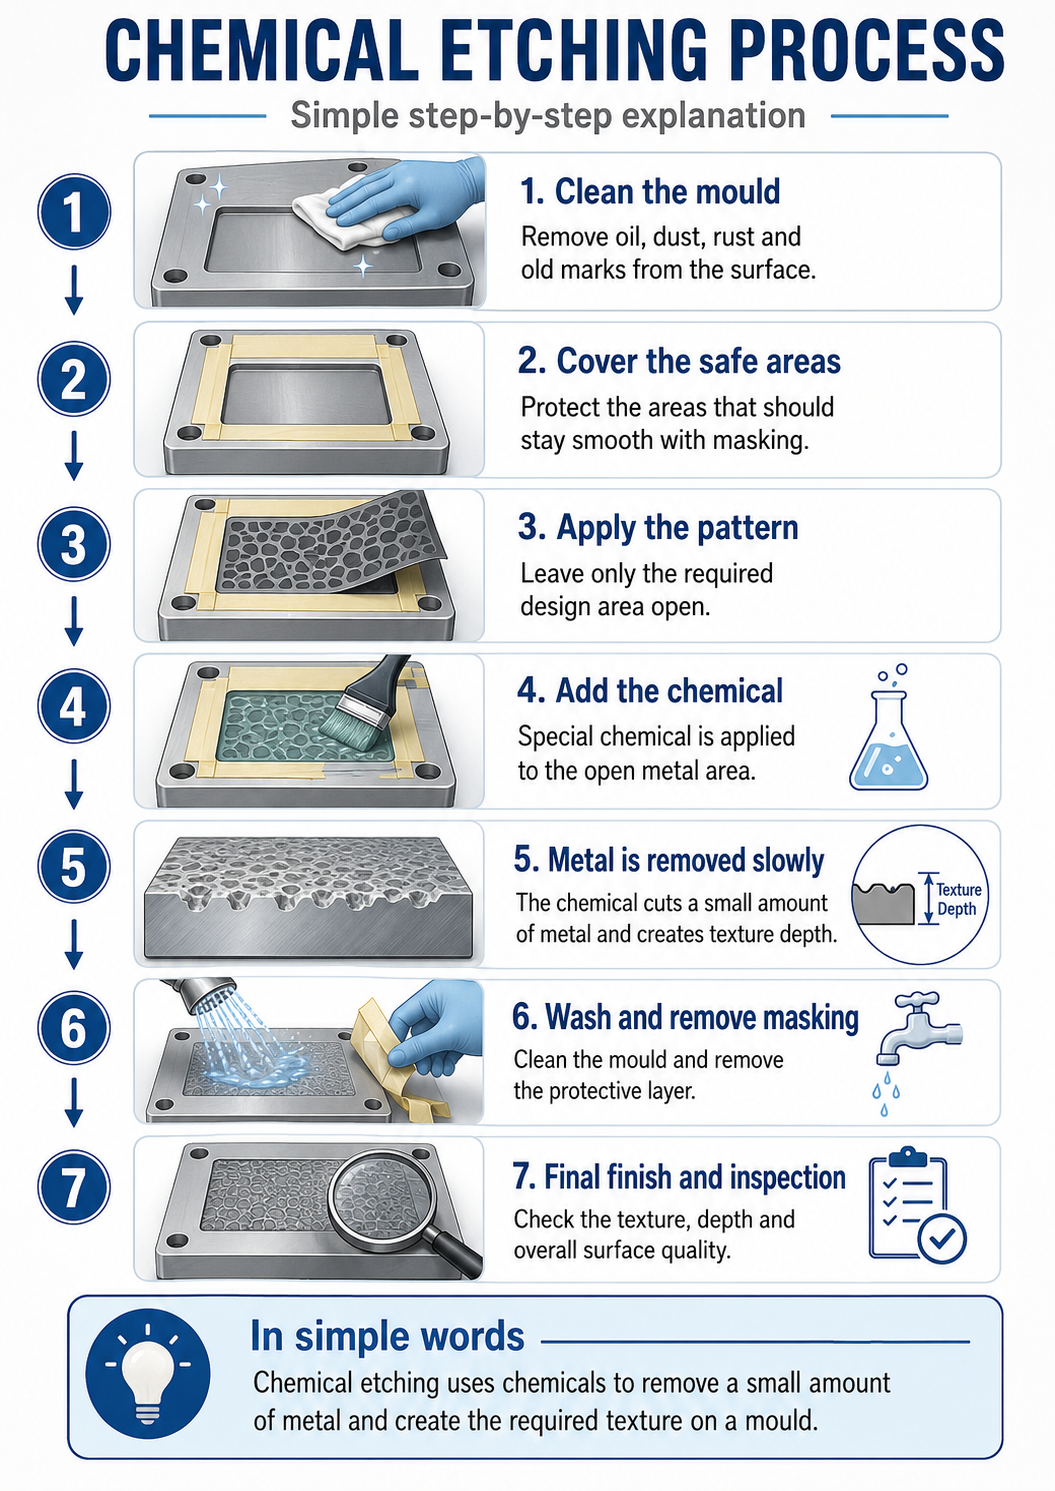
First, the mould surface is cleaned and prepared. Areas that should not receive texture are protected. A selected texture pattern is then transferred to the required area.
Special chemicals react with the exposed mould steel and slowly remove a controlled amount of metal. This creates the required grain or texture.
The process is commonly used for:
- Injection moulds
- Plastic moulds
- Automotive moulds
- Appliance moulds
- Consumer product moulds
- Packaging moulds
- Large mould surfaces
The exact process can change depending on the mould steel, pattern, texture depth, and mould design.
How Does the Chemical Etching Process Work?
A professional chemical etching process involves several controlled steps. Proper preparation at every stage is important because even a small surface defect can affect the final texture.
1. Mould Inspection
The process starts with mould inspection.
The service provider should check the mould for scratches, dents, rust, welding, old texture, polishing marks, and other surface problems.
This inspection also helps identify areas that need special attention before mould texturing begins.
2. Mould Surface Preparation
The mould surface must be clean and properly prepared.
If scratches, old textures, machining marks, or other defects remain on the surface, they may still be visible after texturing.
Mould polishing may therefore be required before chemical etching.
Good mould surface finishing before texturing helps create a cleaner and more even result.
3. Protecting Areas That Should Stay Smooth
Not every area of a mould needs texture.
The areas that should remain smooth are covered with a chemical-resistant protective layer. This prevents the chemicals from affecting those areas.
Accurate masking is especially important around shut-off areas, sealing surfaces, edges, inserts, and other areas where texture is not required.
4. Applying the Texture Pattern
The required grain or pattern is transferred to the mould surface.
The method used depends on the selected texture and the required result.
This stage defines where the chemicals will react with the mould steel.
5. Chemical Etching on Mould Steel
The chemical is applied to the exposed areas.
It reacts with the mould steel and removes a controlled amount of metal. The process may be repeated in stages until the required texture and depth are achieved.
Chemical etching on mould steel requires careful process control. Different mould steels can react differently, so the same process cannot simply be used for every mould.
6. Cleaning and Final Inspection
After the required texture has been created, the chemical reaction is stopped and the mould is thoroughly cleaned.
The textured areas are then checked for:
- Texture consistency
- Pattern quality
- Required depth
- Uneven areas
- Visible defects
- Joint impressions
Only after inspection should the mould move to the next production stage.
Understanding Chemical Grain Etching
Chemical grain etching is commonly used when a mould needs a decorative grain rather than a smooth surface.
Depending on the design, it can create finishes such as:
- Fine grains
- Matte textures
- Leather-like grains
- Random patterns
- Deep grains
- Decorative surface patterns
The required grain should be selected before the work starts.
Manufacturers should not choose a pattern based only on appearance. They should also consider mould geometry, depth, draft angle, steel condition, and release requirements.
Chemical Etching for Injection Moulds
Chemical etching for injection moulds can create a controlled texture directly inside the mould cavity.
This is useful when the same surface pattern needs to appear repeatedly during production.
However, injection mould texturing needs careful planning. A deeper texture can affect mould release. Side walls and other areas in the direction of release need enough draft.
For this reason, texture selection should ideally happen during mould design rather than after the mould is completely finished.
Early planning allows the mould maker and texturing specialist to review the texture depth, draft, surface condition, and difficult areas before work begins.
Why Mould Texture Depth Matters
Mould texture depth is one of the most important factors in chemical etching.
A shallow texture creates a lighter surface effect. A deeper texture creates a stronger and more visible grain.
But deeper does not automatically mean better.
The correct depth depends on:
- Selected texture
- Mould design
- Draft angle
- Mould steel
- Required surface appearance
- Release direction
During chemical etching, depth is built by carefully controlling the chemical reaction and process stages.
Manufacturers should confirm the required texture and depth before starting the job.
How Much Draft Angle Does a Textured Mould Need?
There is no single draft angle that works for every textured mould.
The required draft depends on the mould texture depth, grain type, mould geometry, release direction, and application.
In general, deeper and rougher textures may require more draft than smooth surfaces.
Using too little draft can make release difficult and may affect the textured surface over time.
The safest approach is to review the texture specification and mould drawing before etching. Your mould designer and texturing specialist can then decide whether the available draft is suitable for the selected texture.
Can Welded Moulds Be Chemically Etched?
A welded mould may be chemically etched, but the welded area needs careful inspection first.
Weld metal and the original mould steel may not always react with chemicals in exactly the same way. This can sometimes cause a visible difference in texture.
Before chemical etching for mould texturing, tell the service provider about every welded or repaired area.
Proper welding, surface preparation, polishing, and testing can help reduce the risk of an uneven result. The suitability should be checked for the specific mould rather than assumed.
What Causes Uneven Mould Texture?
Uneven texture can have several causes.
Common reasons include:
- Poor polishing
- Scratches on the mould
- Different surface conditions
- Welding or repair areas
- Uneven masking
- Incorrect surface preparation
- Differences in mould steel
- Poor control of the etching process
- Existing surface damage
This is why inspection and mould surface finishing are important before chemical etching.
A texture cannot always hide a poor base surface. In some cases, texturing can make an existing defect more noticeable.
Important Limitation: Visible Texture Joint Lines
One important point manufacturers should understand is the possibility of texture joint lines.
With chemical etching, there is a chance that texture joint impressions or lines may be visible on the mould.
This can be especially important on large or complex textured surfaces where different pattern sections need to meet.
Manufacturers should discuss this point with the service provider before choosing chemical etching for a surface where a seamless appearance is critical.
Modern 5-axis laser texturing can be a better option when a seamless digital texture without visible texture joints is required and the mould fits within the machine’s working capacity.
Where Chemical Etching Is Still a Good Choice
Laser technology has changed mould texturing, but chemical etching still has an important place.
It can be suitable for:
- Very large mould surfaces
- Certain deep texture designs
- Traditional grain patterns
- Some organic textures
- Moulds beyond the working size of a laser texturing machine
For example, chemical etching can be a practical option for very large mould surfaces of around 4 × 8 feet, depending on the mould design and texture requirement.
The right choice should always depend on the mould rather than on which process is newer.
Chemical Etching vs 5 Axis Laser Texturing

Both processes create textures on mould surfaces, but they work differently.
Chemical etching uses masking, pattern transfer, and controlled chemicals to remove metal from the mould. It remains useful for certain deep grains and very large mould surfaces.
5 axis laser texturing follows a digital design and uses a laser beam to remove metal only where required. A modern 5 axis machine can tilt the laser head and rotate the mould, allowing it to work on curved areas, side walls, ribs, and deep pockets.
Laser texturing also provides high repeatability and can create seamless textures without visible texture joint lines.
So, is laser texturing always better? No.
The better method depends on:
- Mould size
- Mould shape
- Texture pattern
- Required texture depth
- Surface condition
- Need for repeatability
- Requirement for seamless texture
A service provider experienced in both methods can inspect the mould and recommend the more suitable process.
How to Prepare a Mould for Chemical Etching
Proper preparation can prevent many texturing problems.
Before sending your mould for chemical grain etching, check the following:
- Make sure the mould surface is properly finished.
- Inform the service provider about welded and repaired areas.
- Clearly mark which areas need texture.
- Confirm the selected texture pattern.
- Confirm the required texture depth.
- Check whether the mould has enough draft for the selected grain.
- Share the mould drawing when possible.
- Discuss critical areas before the process begins.
These simple steps can reduce rework and improve the final texture.
Choosing a Chemical Etching Service in India
When choosing a chemical etching service in India, do not look at price alone.
Mould texturing requires experience because every mould can behave differently.
A professional service provider should understand:
- Mould surface preparation
- Different mould steels
- Texture patterns
- Texture depth
- Draft requirements
- Welded areas
- Masking
- Chemical process control
- Final inspection
It is also useful to choose a company that provides both chemical and laser texturing. This allows the team to recommend a process based on the mould instead of recommending only the process they have available.
Chemical Etching for Mould Texturing at Jai Ambay Etching Process
Jai Ambay Etching Process has more than 30 years of hands-on experience in mould texturing and surface finishing.
Our team works with moulds, injection moulds, and plastic moulds. We inspect the mould condition, texture requirement, surface design, and other important details before recommending a process.
Our mould finishing capabilities include:
- Chemical etching
- 5-axis laser texturing
- Mould polishing
- 3D laser engraving
- Mould surface finishing
Having different processes available helps us suggest a suitable method based on the actual mould requirement.
For chemical etching, our team pays close attention to surface preparation, masking, grain selection, texture depth, and final inspection.
What Is the Cost of Chemical Mould Texturing?
There is no single fixed price for chemical etching for mould texturing.
Cost can change based on:
- Mould size
- Textured surface area
- Texture design
- Texture depth
- Mould condition
- Surface preparation needed
- Masking requirements
- Mould complexity
- Repair or polishing requirements
For an accurate quotation, share clear mould photographs, drawings, dimensions, and the required texture with the service provider.
This gives a much more useful estimate than asking for a general price per mould.
How Long Does Chemical Mould Texturing Take?
The time required depends on the mould and the job.
A simple texture on a properly prepared mould may take less time than a large mould with deep texture, complex masking, polishing, or repair work.
The process may include inspection, polishing, masking, pattern transfer, several etching stages, cleaning, and final quality checks.
For this reason, the service provider should inspect the actual mould requirements before confirming a delivery time.
Conclusion
Chemical etching remains a useful and proven method for creating grain and texture on mould surfaces.
It is especially useful for certain deep texture designs and very large mould surfaces. However, the quality of the result depends heavily on surface preparation, mould steel, draft angle, texture depth, masking, and process control.
It is also important to understand its limitations. Chemical etching may sometimes leave visible texture joint impressions or lines, particularly on large surfaces. If seamless texture, digital repeatability, or complex curved-area texturing is the main requirement, 5-axis laser texturing may be a better choice.
The best method is the one that suits your mould.
If you are unsure, Jai Ambay Etching Process can inspect your mould, understand your texture requirement, and recommend whether chemical etching or 5 axis laser texturing is more suitable.
Frequently Asked Questions
1. What is chemical etching for mould texturing?
Chemical etching for mould texturing uses controlled chemicals to remove a small amount of metal from selected mould areas. This creates the required grain, pattern, and texture depth.
2. How is chemical texture applied to a mould?
The mould is cleaned and prepared first. Areas that should remain smooth are protected, the texture pattern is transferred, and chemicals etch the exposed mould surface to create the required texture.
3. Which mould steels are suitable for chemical etching?
Many mould steels can be chemically etched, but different steel grades can react differently. The exact steel grade, hardness, heat treatment, welding, and surface condition should be checked before texturing.
4. How much draft angle is required for mould texture?
There is no single draft angle for every mould texture. The required draft depends on texture depth, grain type, mould geometry, and release direction. Deeper textures generally need more attention to draft.
5. How is chemical texture depth controlled?
Texture depth is controlled through the chemical reaction, process time, and repeated etching stages. The required depth should be confirmed before work begins.
6. Can a welded mould be chemically etched?
A welded mould may be chemically etched, but the repaired area must be inspected first. Weld metal can react differently from the original mould steel and may cause a visible texture difference.
7. What is the cost of chemical mould texturing?
The cost depends on mould size, textured area, grain design, texture depth, surface condition, masking, and preparation work. An accurate quotation requires the actual mould details.
8. Is chemical etching better than laser texturing?
Neither method is better for every mould. Chemical etching is useful for some very large moulds and deep grains. 5-axis laser texturing provides digital control, high repeatability, and seamless textures without visible joint lines.
9. How long does chemical mould texturing take?
The time depends on mould size, surface condition, texture depth, masking, polishing, and design complexity. The mould should be reviewed before confirming an exact turnaround time.
10. What causes an uneven texture on a mould?
Poor polishing, scratches, welding, different steel conditions, surface contamination, incorrect masking, and poor etching control can cause uneven texture. Proper mould inspection and surface preparation help reduce these problems.
